This is a very easy and rapid part of retouching even in beauty photography for me. It does not include make-up retouching, that is going to be another part of this serial.
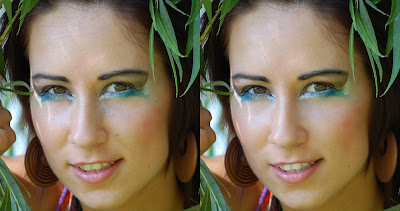
So let's see where we start. You can see the first before photo of my model and next to it the one where I have already finished skin and make-up retouching.
A retusálásnak ezen része talán az egyik legkönnyebb és leggyorsabb a beauty photography kategoriában. Ez nem tartalmazza a smink retusálását, az majd egy másik részben lesz benne.
Lássuk hogy is kezdünk. A bal oldali "előtte" képen látod a modellemet és mellete a már befejezett képet. Természetesen előtte már befejeztem a smink és bőrretust.
 |
| Click for bigger size |
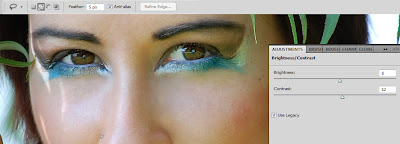
Now the first step: Press Command+J or for Windows users Ctrl+J, this will duplicate your layer. First we are going to increase the contrast even the brightness if needed in the iris, because the eyes look a bit flat to me. So select the eyes with a lasso tool (make sure you are using "Add to Selection" - top photo) or pen tool, which is more convenient for you, and create a new adjustment layer (Brightness and Contrast). Here we can add some contrast not too much you can see on the second picture I added. See how it changed:
Első lépés: Command +J vagy Windows felhasználóknak CTRL+J, ez megkettőzi a rétegünket, így nem veszítünk el semmilyen információt, abban az esetben sem ha rosszul sikerülne a képünk. Fontos hogy sok réteget készítsünk ha elég precízek akarunk lenni, mert így mindig gyorsan visszamehetünk az előző munkafolyamathoz és nem kell újra kezdenünk az egészet. Először megnöveljük a kontrasztot a szemeiben, és ha szükséged van több fényre akkor azt is így nem lesznek olyan unalmasak a színek. A következőképpen fogjuk ezt tenni: jelöljük ki a szemeket a "Lasso Tool"-al (figyelj arra hogy a fenti menüsorban mindenképpen az "Add to Selection" legyen kipipálva- felső kép) vagy használhatjuk a kijelölésre a "Pen Tool"-t is, amelyik kényelmesebb vagy egyszerűbb számodra. Miután kijelöltük a szemeket, csinálunk egy "adjustment layert", a "Brightness and Contrast"ot. Tehát egy újabb réteget ami maszkolva fogja megjeleníteni nekünk az előbb kijelölt képet így tehát ha nem volt túl precíz a kijelölésünk a maszk segítségével tudunk ezen változtatni.
Lássuk hogyan változott:
 |
| Click for bigger size |
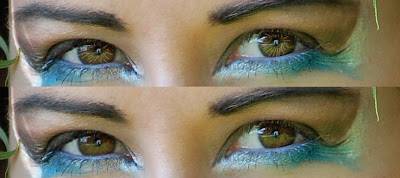
2nd step: Most of the time you will need to add texture to the eyes, to avoid the flatness. The best way to check if it's enough to use Channels, so just click on them and you can see that we need to add some texture.
There is an easy and fast way to do it for Photographers. Create a new layer and place it on the top.Zoom on the eyes and take the eyedropper tool, choose a very bright part/colour of the eye (Sometimes its just white). Now take your brush tool: Size around 1-2 px and Hard is 0 %,Opacity is around 65% or more and Flow is the same.
Start drawing little lines in the eyes, they do not have to be true to type, don't worry about it just draw random lines, smaller or bigger like in the picture on the top. Then Go to Filter -> Blur -> Gaussian Blur and blur it with 1-1,5 radius which you prefer and then change the layer mode toColor/Linear Dodge and start playing around with the Opacity. I prefer it around 40% and the Fill around 75%.
Második lépés: Legtöbbször valamilyen texturát kell adnunk a szemhez, hogy elkerüljük ezt az unalmas, semmilyen hatást és hogy visszaadjuk azt a látványt amit a szemünk lát, de a kamera nem. A legjobb módja annak hogy megbizonyosodjunk arról, hogy még szükségünk van valamilyen texturára, az ha a "Channels"-t használjuk és megtekintjük minden formában (kék, piros, zöld) hogy látszik-e az eredetiből valami.
Van egy nagyon könnyű és gyors módja ennek az alapretusálás terén. Csináljunk egy új réteget, és helyezzük az összes réteg fölé. Nagyítsunk rá a szemekre és az "eyedropper tool"-al válasszunk egy elég világos színt a szem színeiből (sokszor ez akár a fehér is lehet). Ezután vegyük a "Brush Tool"-t, méretben: 1-2 pixelest, persze képtől függő de legyen vékony az ecsetünk; a "Hard" az 0%; "Opacity" kb 65% vagy több picivel és a "Flow" pedig hasonló mint az átlátszóság (Opacity).
Kezdjünk el kicsi vonalakat rajzolni a szembe, nem kell hogy tökéletes vonalak legyenek, ez nem egy rajzverseny és annyira nem is fognak látszódni, szóval véletlenszerűen rajzoljunk csak különböző hosszúságú vonalakat. Ezután válasszuk ki a "Filter" menüpontot és azon belül is a "Blur"-t és ott a "Gaussian Blur"-t. Körülbelül 1-1,5 -es kell hogy legyen a radius de ami neked megfelelő ez képtől függő. A lényeg itt az hogy a vonalaknak ne látszódjanak a szabályos oldalai, csak az elmosódása legyen kivehető. Következő lépésként a "Layer Mode"ot változtassuk "Linear Dodge"-ra vagy "Color"-ra. Játszhatunk is a módokkal hogy melyik néz ki jobban, ez az ízlésünktől függő, de ami fontos hogy az "opacity"-t körülbelül 40%-ra állítjuk és a "Fill" 75% lesz.
 |
| Click for bigger size |
3rd and final step is only to sharpen the eyes. It has so many different techniques. There's two here I prefer.
1. Select the eyes again and create a new layer with Command+J / Ctrl+J. Then go to Filter->Other -> High Pass. I like to use radius around 4,4-4,6 but you will see which fits your artwork even better. Then you have this freakish looking eye so go to Layer mode and change it to Overlay or Soft Light.
2. Select the eyes only and create a new layer like in the 1st way. Then all you have to do is just go to Filter-> Sharpen -> Unsharp Mask
Of course if you selected it not so good and it not only sharpened the eye but other parts too you can still use Layer mask and fade the parts you do not want to see.
Harmadik és egyben utolsó lépés is: a szemek élességének megnövelése. Nagyon sok különböző technikával érhetjük ezt el a Photoshopban. Egyelőre lássunk kettőt, amit én sokat használok a saját fotóimon is.
1. Ismét jelöljük ki a szemeket a fent már említett módon és a Command + J/Ctrl + J megnyomásával csináljunk egy új réteget. Ha ez megvan, menjünk a "Filter" menübe, ott is az "Other" menüpontra, azon belül pedig a "High Pass"-t válasszuk ki. Általában szeretem ha a radius kb. 4,4 - 4,6 között van, így nem is túl éles de szépen kiemeli a szem minden részét. Ez a High pass egy elég furcsa kinézetű réteget alkot nekünk, amin természetesen a "Layer Mode"-ban változtatunk: az "Overlay" vagy a "Soft Light" kiválasztásával. Az Overlay egy erősebb texturát alakít ki, a Soft Light pedig egy sokkal természetesebbet.
2. Jelöljük ki a szemeket és csináljunk egy új réteget az 1.-ben említett módon. Ezután már csak annyit kell tenned hogy a "Filter" menüben megkeresed a "Sharpen" menüpontot azon belül pedig az "Unsharp Mask"-ot és ott beállítod milyen élesen szeretnéd látni a szemeket.
Természetesen nem kell tökéletesnek lenni a kijelölésnek, mert akármikor használhatsz egy maszkot és eltüntetheted azokat a részeket amik nem kell hogy élesek legyenek.
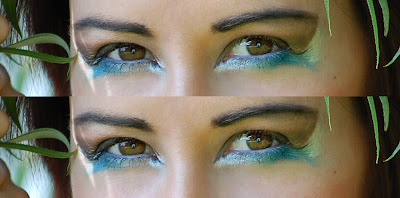
Before/After:
 |
| Click for bigger size |
Hope this was helpful.
Any questions: aya.demeter@gmail.com


